Many bodyweight exercises are often too difficult to simply start practicing the full version from the get go. Before you get to the final expression of the move, you will often have to practice easier variations that help you progress up to it. In this article we’re going to explore all the valid and creative ways you could make exercises easier or more difficult to help you reach your goals!
1. If you can’t even do one rep of something (like a pull up), then do negative/eccentrics!
Working on the negative/eccentric phase of an exercise is a great way to start tinkering with any new bodyweight exercise that is out of reach. The eccentric phase is the part where the muscles are lengthening rather than shortening. It is often the part where you are lowering yourself down. So in the case of a pull up, the actual pulling up part is the opposite, concentric phase. When you get your chin over the bar and hold it there for a moment, that’s the isometric phase. And when you lower yourself down, that’s the eccentric/negative movement. (More info here: The Three Phases of Movement)
The eccentric portion engages the same muscles as the concentric and is easier so you could so you could do negatives to eventually do the full movement. Basically if you can’t lift a specific weight, you might be able to hold it and if you can’t hold it, then you may at least be able to lower it under control. The reason for this is because you are able to generate far more tension during eccentric contractions and skeletal muscles are more resistant to lengthening under tension.
When I first started doing Dragon Flags, I could only lower myself down but I couldn’t raise my self back up. Not to worry. I just kept doing negative reps!
Same deal if you can’t do a single pull up: You just gotta start doing negative pull ups.
How to program eccentrics into your routine: Make a goal of making each negative last 10-seconds. (So when 5-seconds have passed, you are only half-way down.) When you are finally able to do a couple “real” pull ups, you can finish your sets off with the negatives! So if you’re aiming for 3 sets of 8 but can only do 2 pull ups, then do the 2 pull ups and then finish off with 6 eccentric pull ups.
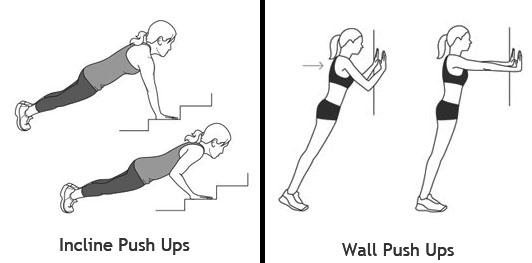
2. Vary the intensity by modifying the incline or decline angle
I’ll give you some examples to make this clear…
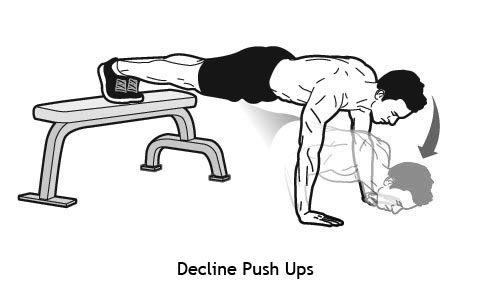
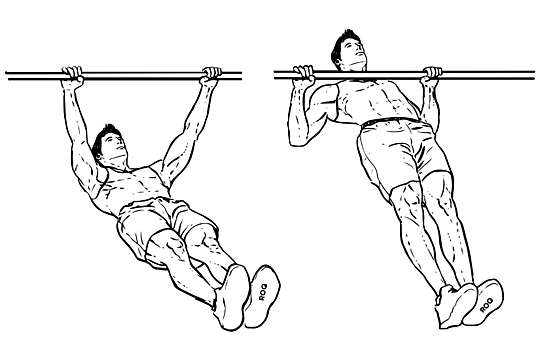
3. Partial ROM Progression
If you can’t work an exercise through its full range of motion, then just focus on an abridged range-of-motion (ROM) and increase the range as you get stronger.
Example: If you can’t do a full pistol squat (single leg squat), then do a pistol squat using a chair or a box so you end up sitting on the chair or box. This way you’ll limit the ROM of the exercise and be able to strengthen the area you could handle. As you get stronger, you could use a lower box until eventually you don’t need the box at all.
Another Example: If you have an ab roller and roll outs on your knees are too easy but standing roll outs are too difficult, then just begin doing standing roll outs for just a few inches. As you get stronger you’ll be able to roll a greater distance.
ProTip: When doing an exercise with partial-ROM, you could also add an isometric hold at the bottom (like say, at the bottom of a dragon flag) for a few seconds to strengthen that part. Strength is built 15°+/- in either direction during an isometric hold so you will be able to expand the ROM.
4. Point the toes or squeeze the fists to create power in the rest of the body
When you’re doing pistol squats, as strange as it may sound, squeezing the fists helps power your legs. From a neuromuscular point of view, this is called irradiation which refers to the phenomena of the dispersion of nerve impulses going beyond the normal path of conduction.
When you point your toes, such as during handstands or L-sits or L-Pull Ups, it usually helps activate the rest of your legs, such as your inner thighs which also stabilizes your core even more. (It’s also a form deduction to not point the toes in gymnastics, but you won’t find me in any competitions so I don’t really care about that.)
Here is my attempt at pointing my toes during my V-sit training:
5. Use weights to increase difficulty
Backpack/vest/belt: All you need to do is wear a back pack with some water, sand, rocks, or books to make your exercise that much more difficult. There are also weighted vests and dipping belts for this purpose as well. Weight vests conform to your torso but they reach a practical limit quite early in your training. If you have a dip belt, however, you could put A LOT more weight than a vest.
Add ankle weights for levers: Moves such as the human flag, dragon flags, L-sits and front/back levers become significantly harder by putting on some ankle weights because you’re increasing the weight at the very end of the lever. Hell, even just doing pull ups with 6lb ankle weights is an easy way to get even stronger as well!
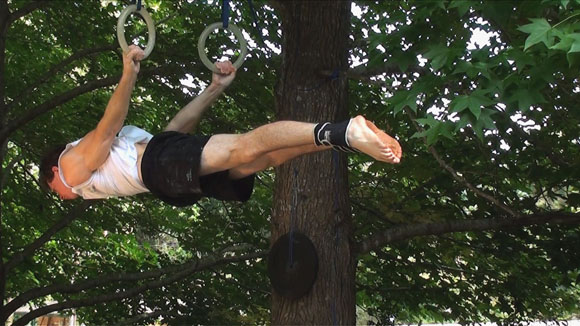
Here is an example of how adding some weight at your feet significantly increases the difficult of the Hollow Hold exercise to strengthen your core:
6. Apparatus choice
Bars versus Rings
If you are a beginner I would recommend you perform your foundational work on the single and parallel bars. When you have built up some basic strength such as support holds, pull ups and dips, it’s time to move to the rings. Due to their instability, they will take your workout to unparalleled levels. For you bioengineering heads, the rings are extremely unstable because they move on an almost frictionless, horizontal plane and it’s mostly your shoulders that have to stabilize them.

Anything done hanging below the rings (like pull ups and skin the cats) are not much more difficult than a bar. However, anything done above the rings, like support holds, dips, and shoulderstands are tremendously harder. For example, here’s a video of me holding RTO Support for 60seconds. It looks super easy but it’s extremely deceiving how hard it is and took many weeks to get to this simple level:
One anomaly about the rings is that while they are more difficult, they’re nice that they move independently of each other and move to whatever position is neutral for you. (I’ll take a German Hang on the rings over the bar any day.) Luckily in this day and age, a pair of wooden rings are going for dirt cheap these days. You could hang them anywhere and have a blast! Also, while I’m at it, since I’m talking about rings (my favorite apparatus), I think if people knew how to use them, they’d realize they wouldn’t need ANYTHING else for their upper body. (Gyms hate me!)
Of course, if you are ever having too much trouble with an exercise on the rings, you can always go back to the bars. On my deload weeks, I may opt to do dips on the parallel bars instead of the rings because the stress on the body is significantly less.
Surface choice for hand balancing:
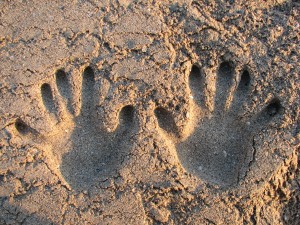
A solid, flat floor with no slope provides the most consistency. Grass is hit or miss. Sometimes grass helps you grip better but other times it seems to be a little too quirky. However, I like grass though because if you fall out of any headstand or handstand, it’s squishy and it’s very nice to do a forward roll out on grass. Sand is the most challenging for hand balancing because it’s always shifting underneath you, so it’s definitely not recommended to practice on otherwise it’ll get too frustrating. For example, holding crow pose (aka frog stand) on the carpet at home may be easy for you, but next time you go to the beach, test your max hold on the sand and you’ll find it gets unusually harder to stay up there, much faster than usual.
Use parallel bars, parallettes or sloped handstand blocks to give your wrists a break:
The wrists are made of very small joints that weren’t intended to deal with the entire weight of the body so they take a long time to catch up to the stress that handstands and planches require. However, when you use pushup bars, paralletes or sloped handstand blocks, they ease off a lot of pressure from your wrists and allow for more quality practice. (The same goes when practicing L-sits and V-sits, but please start practicing your L-sits on the floor to properly train your shoulder-depression and hip-flexion. When you could do L-sits on the floor, you could do them on the parallel bars and rings. The inverse is not true.)
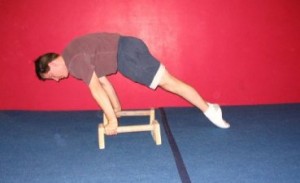
- More info for wrists:
7. Master the False Grip
The false grip is the secret to many moves on the rings. This puts your hand in such a position that you don’t have to rotate it around when doing a muscle up. It also gives you more leverage because it’s effectively reducing the length of your arms. In fact, many moves, such as the muscle up or iron cross, are too difficult without the false grip. Only after you’ve mastered them with the false grip, is when you could try doing them with a normal grip, if you wish.
False grip on the rings: Instead of holding the ring in your palm, the outside of your wrist (pinky-side) goes over the the ring, like a monkey grip. It’s (very) uncomfortable at first, but like anything else, you’ll get used to it and you’ll have monstrous active flexibility strength of the wrists in full flexion. Chalk the outside of your wrists otherwise you’ll just slip out of this position, especially if you are using plastic or metal rings. (Wooden rings have the best feel and grip.)
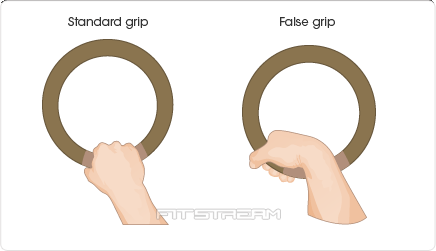
False grip on the bar: With the false grip on the bar, the entire wrist goes over. Look at the picture below to get an idea of what that looks like. This also builds up incredible amounts of active wrist flexibility and forearm strength just like on the rings. In any case, I recommend you get comfortable with it on the bar as well because it’s going to be very helpful when attempting to perform non-kipping muscle ups. (In such instances, if can be helpful to use an exaggerated false grip with your closed fists completely on top of the bar.)
Here’s a demonstration below:
https://www.instagram.com/p/Bn1cVzxndfV/
If you need a false grip tutorial:
8. Use a band to make things easier (assistance) or harder (resistance)
Resistance bands can also be used as a replacement for weights to add pizzazz to your bodyweight routine! A strong resistance band creates the ingenious opportunity to scale many movements safely. (This awesome band provides 75lbs of force.)
Examples of awesome assistance:
- Can’t do a pull over on the rings? Don’t worry, with the band, it’s much more likely.
- Can’t do a non-kipping muscle up on the bar? Why not start doing band-assisted muscle ups?
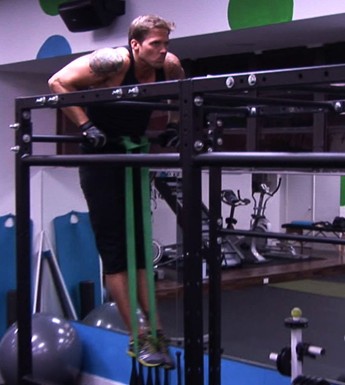
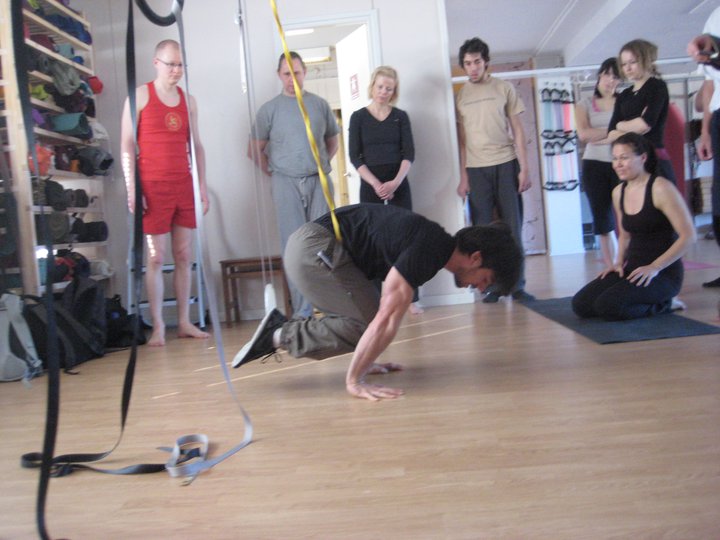
9. If you think you’ve maxed out the exercise and don’t have the equipment to make them harder, do the one-arm version.
Just like how a bodyweight-squat is very easy, but a pistol squat is much harder, you could apply the same concept to many upper-body exercises. You may be thinking of one-arm pushups and one-arm pullups, but I personally don’t like the way one-arm pushups feel on the joints and one-arm pullups are for very advanced trainees so here is some more practical advice here that is applicable to the greater population:
- You might find it easy to do rows on the rings on the lowest setting but you don’t have the equipment handy to raise your legs to make your body horizontal and make it much harder. (And you’re not strong enough to do tucked-front-lever rows.) In this scenario I would do one-arm rows. This makes is significantly harder, to the point where you’ll have to probably raise the rings to do slightly more inclined, one-arm-rows to find a more appropriate intensity.
- The same exact scenario above can apply toward rings-biceps-curls!
- You could also apply negatives to these, where you row (or curl) with both arms, release one arm and lower down as slowly as possible and repeat. (One of my favorite methods!)
- Another favorite is when you’ve maxed out dragon-flags, you could try doing them by holding on with only one arm. And again, you could do the negative here by raising your body up using both arms and release one arm and you slowly lower down.
The advantage here is that you may discover one side is stronger than another (and you had no idea) and you could work on balancing them out. (ProTip: Do the weaker side first when doing unilateral exercises.) The drawback is that the exercise will take more time because you have to do double the sets.
10. Many exercises become accessible by doing the foot-supported-version
You may have noticed that there is something in common with my rings-muscle-up tutorial, bar-muscle-up-tutorial, crow-pose-tutorial, and L-sit tutorial. And that is that they all have you train the movement with your feet resting to alleviate some of the force. This can help you actually build up the strength (or balance in case of the crow pose) for an exercise that might have been thought to be out of reach. It is also crucial for training the movement-pattern, because sometimes you may have the strength to do the exercise, but if the movement pattern is neurologically foreign to you, that will help you get more coordinated.
https://www.instagram.com/p/BVnfybfn5Vu/?taken-by=antranikdotorg
11. Utilizing Momentum through Kipping or Swinging
Purposely adding momentum generally makes things easier. Some people call this “cheating” but that’s just childish talk because momentum has its place not only for getting more reps in but also building up some explosive power.
By the way, if you want an in-depth presentation on the pros/cons of different types of muscle ups, watch my video here.
Kipping: When you first learn a muscle up, you’re undoubtedly going to kip, meaning you’re going to drive your knees up to your chest to help get your elbows up and over. If you let your legs hang like dead weight, the move is going to be dramatically more difficult. So in the beginning, you might start with kipping muscle ups and kip less and less until you could do a strict muscle up.
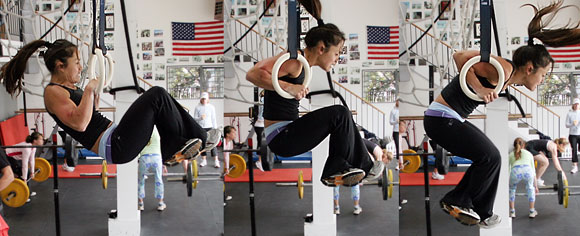
There are also kipping pull ups, which cross fit is associated with and it’s the butt of jokes because they look so hilarious. (Personally, I prefer strict, clean pull ups from a dead hang. If you can’t do a single dead hang pull up, start with eccentrics.)
Swinging: In the video below you will see a demonstration of upper arm pike leg lifts. This is a brutal exercise and in the beginning it was impossible for me to perform these without generating a swing. In the video he DOES NOT start the exercise with any swing, however, it is acceptable to use a bit of swing when starting out to make it possible.
12. Transition smoothly between moves to create a calisthenics or gymnastics flow
Once you’ve gotten a decent amount of strength and can do a few intermediate moves, you could start linking them up together. This can help make things a lot more fun and build up your endurance while you’re at it.
If you’re able to hold the front lever and back lever, then why not step up your game by learning to transition between the two? These are known as 360° Pulls:
13. Implement a Steady State Training Cycle to prevent injury from training static/isometric hold exercises
The back lever, front lever, planche, iron cross and many other intermediate to advanced straight-arm moves place tremendous stress on the connective tissues that hold you together. The muscles may be very capable, but the connective tissue may not, especially at the elbow and shoulder joints. If we apply the usual progressive overload principles to these static holds, we may injure ourselves because the muscles recover faster than the joints, making us think we are strong enough to keep going when our joints are not. The solution is to apply a Steady State Cycle. It’s a training cycle where you perform the same volume (e.g., 4x15sec) for 8-12 weeks on the same progression exercise (e.g., straddled back lever). In the last couple weeks, it will feel easy, and that allows enough time for your connective tissue to adapt to the stresses. Click here to find out how you can make your own SSC plan.
14. Regress/Advance the body-shape
Regression example, Wall-Runs in an L-Handstand: If it’s too difficult to do “wall runs” (shoulder-taps) in a handstand, think about what is an easier shape than a handstand but still mimics the shape the arms and torso would be in a handstand? The answer to this would be to do them in a declined, pike push up position (which I call an L-Handstand), like this:
When that exercise feels too easy, you could make it harder by slowing down the tempo so you spend more time on each individual arm and/or increasing the amount of time spent or number of repetitions per set.
Advancement example, L-Pullups: If pull-ups are too easy, simply raising your knees up in a tuck, or feet up with straight legs, will make the pullup significantly harder on your lats and upper back. The reason for this is because if the legs are up in front of you, your torso will now be further behind the bar to balance your center of mass. If your torso is further away from the bar, the lats and upper back need to work harder to pull you upwards. Here is an impeccable example:
15. Another way of advancing the shape would be to do the offset, unilateral version
For the Legs:
- Weighted Option: If you workout at home (or in a park), you may not have a squat rack and enough weight to do heavy-enough barbell squats and deadlifts, but you might have enough weight in the form of dumbbells (or a heavy stone in the park) to do weighted bulgarian split squats and single leg romanian deadlifts which don’t need much weight to feel challenging since they target one side at a time and they’re safer on the lower back. (We all have heard of pistol squats, but the limitation there is that there is only so much weight you could hold when doing pistols with your arms outstretched, so the limitation there becomes your shoulders and not your legs.)
- Limbering Up: Cossack Squats are excellent in regards to building better flexibility and mobility as it helps stretch your adductors and groin more-so than a bilateral deep squat.
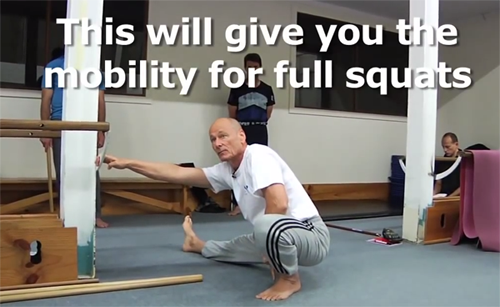
Kit Laughlin demonstrating Cossack squat progressions.
Pushing the upper body unevenly:
- Instead of a push up, you could opt for Archer Pushups and then moving to Archer Pushups with one hand elevated. After those are mastered, you’ll have a strong foundation for the Lizard Crawl progressions. A lot of people think the one-arm pushup is the ultimate goal, but I believe the lizard crawl is even more impressive because it involves not only one arm to be in the air but also one leg momentarily while moving forward (or backwards, even harder) so it improves coordination and improves your hip mobility as well.
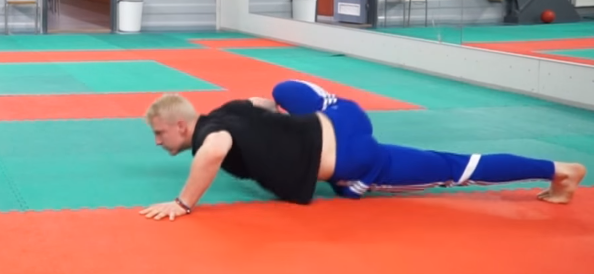
- After you master those, and you want to level up, do the Archer pushups on the rings. Everything is much harder on the rings.
Pulling the upper body unevenly:
- Archer rows and archer/typewriter pull ups can be quite beastly. (As well as the typewriter variation that can be done.) There are also mantle chin-ups (uneven chin-ups) if you have rings which allow you to be even more variable with the offset but require a bit of tinkering around until they don’t feel awkward. These are good to master before going for more direct one-arm variations (such as one arm pull up negatives.)
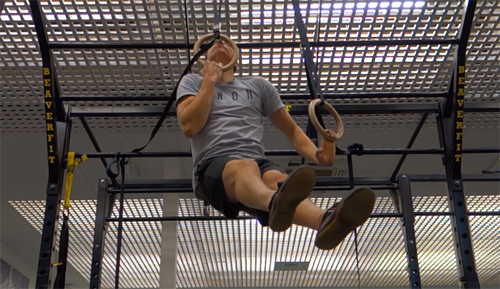
16. Progression exercises for static/isometric holds (front/back levers, planche, etc)
As ones legs extend away from the body, the lever (that’s you!) becomes longer and your musculature has to work harder against the increased leverage. When you scale an exercise with the following progressions, you can focus on proper form and progress with a strong foundation while slowly leading up to the full version.
From easier to harder:
- Tuck
- Advanced Tuck
- Single Leg Tucked
- Straddle
- Half-Layout
- Full-Layout / Straight

For more detailed photos and descriptions demonstrating, check out this article I wrote specifically on understanding progression exercises for static holds.
Sometimes we need to be very creative when trying to figure out how to bridge a bodyweight exercise toward our goals and I hope this article helped you! Thanks for reading and have fun!
