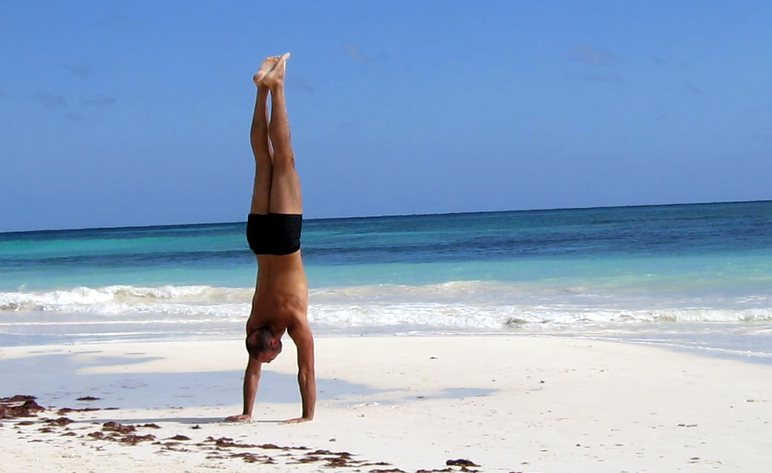
I often see people trying to kick up into a handstand over and over for weeks/months on end with their back to the wall or worse, with no wall. Unfortunately these futile attempts lead to nowhere. Achieving a freestanding handstand is NOT a straight-forward and linear journey like some other bodyweight exercises, but hopefully with the help of this article you will be one step closer to finding that floating feeling.
This tutorial emphasizes the following:
- the wrist warm up
- opening the shoulders
- strengthening the core
- the hollow body position
- proper wall progressions
- rebalancing drills of all kinds
- proper ways to enter AND exit the HS
- the neuromuscular aspect of balancing
- and finally, the handstand with a flat-back.
I have put together as many photos and videos to demonstrate things perfectly to help you (and shot a couple of my own to fill the gaps). The strong point of this tutorial is not only that it is complete, but it includes LOTS of intermediary drills to help bridge the gap between the wall handstand and the freestanding handstand and get your brain working upside down.
Inspiration for this article stemmed from my want to help those participating in the Handstand Motivational Month. Most of the participants are rank beginners and we had a few users questioning the reasoning behind the progressions. Thank you for asking those questions because YOU inspired me to start putting together this article to help everyone understand WHY we are going for a straight handstand and WHY the progressions are setup the way they are.
Straight versus Arched HS
The goal of this article is to help you achieve a straight handstand with a flat back.

All the progressions in this article are listed in such a way as to naturally help you achieve a handstand with as flat of a back as possible. The gymnastics-style, straight HS allows for the greatest efficiency and requires less muscle use because your bones stack up on top of each other. The straight handstand forces you to improve your shoulder flexibility, makes you engage your core more, and can translate more readily to more advanced moves. The mechanics of this are explained further in the sections that follow.
Note: I don’t believe there is anything “wrong” with an arched handstand if that is YOUR goal and you feel that is good enough. It is, however, helpful (and downright necessary) to learn a straight HS if you want to progress to more advanced moves. Most people get into an arched HS even when they try to learn it straight. The goal of this article is to, at the very least, MINIMIZE the tendency to arch. If one is lacking flexibility, the arched handstand will be the only position they COULD get into so that is why there is a massive shoulder mobility section. I believe that if you’re going to learn something, you might as well learn it the proper way from the start. FWIW, I think Scorpion and Mexican Handstands look pretty and are quite impressive. But this isn’t about looks. You will simply get MORE out of your handstand practice if you hold yourself up to higher standards. Opening the shoulders will improve your posture and working on the hollow body position will make your core even stronger! So let’s move on to the good stuff…
Wrist Flexibility and Warm Up
Warming up your wrists is probably the #1
most important thing when it comes to HS practice.
Please do NOT gloss over or skip this stuff. Your wrists were not intended to handle your entire bodyweight on them like your robust ankles were. They are a weak point that you must not neglect. You must warm them up properly and get the blood flowing through them to help get them ready. Andreo Spino says this often: “Most people often start trying to get into a handstand, not realizing that their wrists don’t have the proper articulation prepared to handle the load or the range.”

Do this warm up before ANY handstand session:
That video has done wonders for people. It will strengthen and dynamically stretch your wrists at the same time, reducing fatigue and soreness. It is what has made wrist sprains a thing of the past for me.
Optional: If your wrist extension is sorely lacking, spend some extra time opening the wrist after the warm up with the following:


After you passively increased your wrist extension range, now solidify your gains by adding strength in the range with this drill:
View this post on InstagramA post shared by Brian Johnson (@brianmovement) on
Bonus: Novel Wrist Movements. This serves as an amazing wrist warm up in combination with the above.
Basic Shoulder Mobility 101
If you can’t bring your arms 180° overhead without your
lower back compensating for it, you’re going to have a banana-back.
When people talk about “open” shoulders in regards to handstands, they mean of the ability to bring the arms overhead 180° or more without the rest of the back arching to cheat you there. Short of hanging from a pull up bar, there aren’t many activities in daily life that require a full 180 degrees of overhead shoulder flexion. The average person usually only has 150°, far less than you need for a good handstand. (Not just adults but even kids these days sometimes have a kyphotic, hunchback posture due to technology so it’s a good idea to correct this.)


Test your shoulder mobility for HS:
(Remember to bend your knees and glue your lower back to the wall during the tests):
If you didn’t pass the tests, that’s okay, there are many ways of opening your shoulders. We want to stretch the internal rotators (lats, subscapalaris) and strengthen the external rotators. Emmet Louis has written a beautiful blog post dedicated to solely this topic which includes myofascial release, strengthening and stretching. You have many options, which means less excuses…
Here’s a summary:
Strengthen your external rotators! (2x/week, 4×10 reps)
It helps to not only have the passive flexibility, but the strength in that range.
- With weighted stick: Cuban Rotations (my favorite!)
- With light weight: Trap-3 raise variation (keep thumb up)
- With band: Rear Delt Pull Apart (These Aylio bands are fine for this)
Stretch your internal rotators! (3-5x/week, preferably after strength training)
- Eagle Arms
- With back to wall HS: This shoulder opener is very powerful (my favorite!)
- With friend: Partner assisted shoulder opening is also very powerful
- Variation 1: Looking down, partner presses on deltoids.
- Variation 2: Looking up, partner presses on lower part of shoulder blades.
- Consistent pressure is effective enough.
- With furniture: Butchers Block
- With doorway/pole: Side lat stretch (another video but this shows the feet)
Daily Mobility Maintenance / Fascial Release
- With foam roller: Clean up fascial adhesion in the armpit area (link to my fave roller!)
- With band: Improving shoulder mobility by Kit Laughlin
- With floor: Scapular Shrugs to free up the upper back
- With floor: Childs pose with side stretch to stretch lats/teres
More stretching options:
- When you have the ability to kick up to a back-to-wall HS, this back to wall HS shoulder opener is very powerful and absolutely the best. Basically push your chest away from the wall, tuck your chin to the chest, straighten your arms and push the chest away even more and keep repeating. Keep that chin tucked to help emphasize the shoulder opening. Don’t slide your butt down the wall too much as it can hurt your lower back.
- With floor: Puppy dog on the floor
- With wall: Puppy dog pose against a wall
- With stick or band: Dislocates (don’t add weight until comfortable without it)
- With straps and blocks: Shoulder Opener for Forearm Stand (helps with HS)
- Holding the forearm stand with hands parallel requires even more external rotation than a regular handstand, so if you open your shoulders up for the forearm stand, it will help your handstand. For this you would need to place a block between your hands and a strap around your elbows and kick up into a forearm stand. If your shoulders are tight, you’ll feel it. Definitely make this the last thing you do.
Note: Stretches feel different for different people depending on how tight they are. Some are more intense than others. Variety is helpful. I recommend you try them all and find what works for you. When you exhaust a stretch, review this above list and find a more intense stretch. When you find something that’s intense for you, spend at least 2+ minutes in a stretch to make lasting change while breathing deeply into the stretch. (Breath in and out into the area that you feel is stretching using your awareness.) Use a timer to ensure you’re in it for 2 minutes.
Basic Core Strength and the Hollow Body Position
If you cannot perform the hollow-hold, your back will arch
because your abs are weak, so it’s really important you work on this!
First, I want you to understand what we mean by the hollow body position. Normally, your spine has many curves like this…
![Look at all those [natural] curves.](https://antranik.org/wp-content/uploads/2014/08/curves-natural-spine.jpeg)
But in a STRAIGHT handstand we want the spine (notably the lower back) to be flat like this as much as possible. We literally want the bones stacked on top of each other so the muscles don’t have to do as much work. That’s how handstands can become effortless for hand-balancers.
To help achieve this flat back, we must recreate “Posterior Pelvic Tilt” (PPT) in the hips:

Standing Drill: While standing normally, wildly exaggerate posterior pelvic tilt (PPT) by squeezing your glutes to tuck your tail bone under. You want to make it such that your booty is not sticking out whatsoever. (Chronic PPT is sometimes called “no ass syndrome.”) Look in the mirror while you do this. I don’t care how big your butt is, if your butt is sticking out, make it such that you have a completely flat ass. When you go into the hollow hold on the floor or in a wall-handstand, you’re going to want to replicate this same tilt. It’s kind of confusing when you’re upside down, that’s why it’s nice to do this drill while you’re standing. If you do it correctly in a wall handstand and peel your feet off the wall, you should feel your balance is a lot better! The bones stack up just right!
Now, to strengthen your ability to hold this position, do these bodyline drills on the floor…
Holding the posterior pelvic tilt (PPT) while upside down takes a lot of ab strength. The following bodyline drills work very well for waking up your core and getting it ready for handstands. In the video, I hold each position for 60sec so you could hold them with me and increase your ability to hold full body tension. Pay particular attention to the hollow hold as it will strengthen your abs the most and it’s the same PPT position you’re going to replicate while upside down.
Plank-> Side Plank -> Reverse Plank -> Hollow Hold (5:20) -> Arch Hold
The hollow hold teaches you how to flatten your lower back with the use of your glutes and abs while you lay on the floor. The glutes help to tilt the hips and the abs are what help to flex the spine (opposite of spinal extension; arching), so you need to master the hollow hold to produce rock solid tension in that area. You will find it is the most difficult of the bodyline drills!
Now, remember how I just said that holding that posterior pelvic tilt while upside down takes a lot of ab strength? Well, I lied. It takes an INSANE amount of ab strength to stay rock solid in a freestanding handstand!
So in actuality, you’re going to need to do an exercise that stresses your core much more than hollow holds exercise. For this reason, I recommend that after you master the hollow hold, start working on dragon flags. In a dragon flag, you’ll be trying to maintain that posterior pelvic tilt, except this time, your butt will be in the air as well, which will get your core strong enough for the rigors of handstands. Begin with slow, negative dragon flags: Here is my tutorial for that:
Get Over the Fear with the Wall Plank
For most adults, getting inverted is very scary if they’re not used to it. It’s not a position people are used to. Some people can feel paralyzed because they’re not even sure where their body is in space anymore and how to control it. If you’re one of these people (I know I was), start with this inverted 45° bodyline drill, also known as the wall plank:
The beauty of this is that you could just step your foot down if you feel like coming down. As you get comfortable breathing in this position, you could bring your hands closer to the wall for a nice chest to wall handstand.
Basic Chest-to-Wall Handstand 101
We begin with the the chest-to-wall HS because starting with the
back-to-wall version WILL ingrain the wrong positioning with an arched back.
The chest-to-wall handstand (“CTW-HS” from now on) is a natural progression from the wall plank. If you begin with back-to-wall HS, you will automatically arch your back when the feet hit the wall and that is a difficult habit to fix later on. At least if you know you’re not arching, you can focus on all the other cues to generate full body tension while upside down.
Dan Jeong demonstrates the perfect line as he brings the wrists closer:
When beginners get inverted, their proprioceptive awareness declines and they forget to stay tight, so here are some cues to help:
- Lock those arms out. Zero bend in the elbows.
- Hands should be shoulder width apart, not wider or narrower!
- Take this time to really work on engaging everything
- shoulders shrugged up to the ears
- tucked tail bone (posterior pelvic tilt! hollow!)
- glutes active
- inner thighs together
- legs locked
- feet pointed
- Practice shallow breathing evenly. Do not suddenly inhale/exhale a bunch of air. If you did that while freestanding, you’d lose stability.
- Don’t go until failure so you have energy left to walk your hands back out.
How close should the wrists be?
- The closer the wrists get to the wall, the easier it will feel because you’ll start feeling the floating feeling, but you really have to emphasize tucking the tail bone and opening the shoulders to make this effortless feeling come to light in a CTW-HS. (It’s possible to still be arching your back in a CTW-HS if you don’t work at it.)
- Making the long-term effort to move the wrists within 1-2″ from the wall will open your wrists and make for excellent alignment. When you’re that close, press the chest (not stomach!) into the wall for perfect alignment.
- Another cool trick: Begin your CTW-HS with feet pointed so the tops of your feet are touching the wall. When you could get your hands within 4 inches or less from the wall and you wanna take it up a notch, flex your feet so only your toes are touching the wall and that subtle shift will cause your legs and body to go over your hands more (over your knuckles/fingers) rather than staying just over the heel of your hand.
Ryan Hurst demonstrates the CTW-HS and tells you to lock your arms and look at the wall:
ProTip: When you feel the floating feeling in that CTW-HS and think you’re going to go over, DIG YOUR FINGERS INTO THE GROUND and it will help prevent you from toppling over! We will revisit this and other “rebalancing” drills further throughout the article.
How to Bail Out of the Handstand
The handstand can be scary if you don’t know
how to safely get out of it so here is some guidance.
Walk Out (Beginners): If you’re just starting out, just get comfortable with the CTW-HS and walking your hands away from the wall and bringing the feet down before you’re tired.
Pirouette Bail (Beginners): Other than simply walking out of the CTW-HS, the Pirouette Bail is going to be the next easiest thing to learn. It can be done in any type of handstand (wall or not). It’s basically like the second half of a cartwheel. This video by Paisley Anne is excellent because she shows you how easy it is to literally just bring your foot down to the side:
Bonus Drill: You will naturally prefer to bail out on one side… so for a great mental/physical challenge, try purposely bailing out the other way as well. Strive to be ambidextrous.
Bonus Drill #2: If you’re getting comfortable with the pirouette bail, you might be comfortable enough cartwheeling straight into a Chest to Wall HS and walking your hands closer to the wall.
Forward Roll (Intermediate): If you are strong enough to lower yourself slowly in a handstand, like a negative handstand push up, then you could do the Forward Roll by tucking your chin to your chest as you lower down and you’ll just roll out safely on your back. This is super fun and the way I do it nowadays if I’m on grass or a mat. Watch this video by Carl Paoli if you want to learn more. At about 2 minutes in, he shows how to do it from a chest to wall HS.
Drills To Do In a Chest to Wall Handstand
When you could comfortably hold yourself up in a CTW-HS,
here are several drills that will help challenge you in that position.
We can’t just keep working the static handstand positions against a wall and expect to seamlessly transition to a freestanding HS. We need to do many different drills to test our ability to get into different shapes and positions and learn how to control our body. So, let’s explore some great drills…
Prerequisite: You shouldn’t jump into these until you feel very comfortable with holding a CTW-HS for 3-5 times for 30sec.
One Leg Assisted Hold (5 sets of 15+15sec per leg)
Go in a CTW-HS a couple feet from the wall. Then bring one leg straight up to be in line with your body and over your hips. Don’t just let it limply float! Make that leg reach up with excitement! Energetically make that leg reach for the sky! Then remember to squeeze your glutes so you won’t arch your back. (Take a video of yourself so you see your positioning.)

One Leg Assisted Switches (5 sets of 10 switches)
After you’re comfortable with the above drill, you could switch the legs dynamically but staying in control the entire time and feeling your balance. Again, don’t be limp here! Remember, the leg is not just passively moving but REACHING UP to make you lighter.
Wall Scissor (intermediate)
This exercise requires proficiency in the above drills so don’t rush into it. We want quality movement like Yuri Marmerstein shows below. It’s also a lot harder than he makes it look if you’re still a beginner. Look how he takes one foot off the wall and then the other leg meets it for a moment. So for that moment, the legs are together and you’re completely freestanding before bringing the other leg back on the wall.
In/Out Shoulders
Chris Silcox demonstrates the importance of not only the hips or legs for counter balancing the handstand, but the position of the shoulders. Play around with this in a chest to wall handstand and you will level up incredibly fast!
Toe Pulls
Go in a CTW-HS about a foot from the wall. Planche your shoulders ahead of your wrists. Then, pike/flex your hips to bring your butt over your shoulders. Then, with the feet together, extend the hips so they pull off the wall. (So when your feet come off the wall, because the hips were piked/flexed and your shoulders were planched out, you simultaneously open the shoulders as the feet go over the hips.)
Remember to try to get both feet off the wall TOGETHER at the same time. Then, with control, put your feet back on the wall and start over again by planching your shoulders forward, then bring the hips over the shoulders, and then extend the hips to bring the feet off the wall. Again, your legs need to be TIGHT and need to pull off the wall TOGETHER. Think of it as the last 5-10 degrees of a pike press where you’re focusing on hip extension for the last 10 degrees. A good goal is to build up to doing 10 reps of these in a set. This is yet another way to learn how to save a handstand.
Benny Ferguson’s demonstration of Toe Pulls:
Emmet Louis’ tutorial for Toe Pulls:
Look At Your Toes
So here’s an interesting one. Go into a CTW-HS about a foot away or less. Instead of looking at the wall or down at your fingers, look up at your toes. This is a very interesting exercise because you could feel how it flattens your back and opens your shoulders. It will also train you for a higher degree of proprioception because moving your head messes with your sense of balance, especially if you try this while freestanding.
Bonus: If you try this in a freestanding HS, you can also see the mistakes you are making:
- If you cannot see your toes, it means you are arching.
- Alternatively, you could see if you are piking too much.
- An advanced drill is to try to change your head position in a freestanding HS, without it affecting your position, like Yuval Avalon demonstrates here.
L-Handstand
This is often a missed part of handstand training and as Ryan Hurst suggests: “The L-Stand is really great to shore up some weaknesses we have in our shoulders as well as our form.” The L-stand is surprisingly difficult and can also help open your shoulders. If you can’t replicate the L-shape and your hands have to be a little bit further away from the wall, that’s totally okay. Everybody is different. The less flexible you are or the taller you are, the higher your feet need to be to get the hips over.
When you feel yourself getting tired, you have two options:
- You could bring the feet down and rest.
- Or raise one leg up to the sky and it will become easier (surprisingly so).
L-Handstand Shoulder Taps (Intermediate)
Once you are comfortable with the L-handstand, you could try “Wall Runs” in that position to help strengthen your shoulders further. Wall runs are extremely difficult, so I scale them by doing them in the L-position. It will also reveal whether one arm is stronger than the other and even them up.
There are many ways to challenge yourself with these:
- You could go for time (e.g., 60sec) or for reps (e.g., 50 shoulder taps).
- You could do them slower so you spend more time on one arm and make it harder.
L-Handstand Shoulder Taps with one leg up (Intermediate)
I don’t have a video for this yet, but it’s the same thing as above, but stick one leg straight up above for more weight on your arms.
L-Handstand Push Ups (Intermediate)
Handstand push ups help build overall shoulder strength and stability. Putting you feet on a box makes it much easier and scalable. The higher the box, the more like a freestanding handstand it will be. Try not to flare the elbows out. If your hamstrings are tight, simply bend your knees. Do not go to failure so you have energy to come out of it safely.
L-Handstand Push Ups with one leg up (Intermediate)
How to Enter the Back-to-Wall Handstand
Now, to learn how to enter a handstand, like a boss.
Prerequisite: Don’t jump into these until you feel very comfortable with holding a 60sec CTW-HS. When you have that, you could start practicing entering a HS with your back to the wall to support you. For all of these, don’t crane your neck excessively so your head doesn’t hit the wall!
The Single Leg Kick Up (Beginner)
This method gives you the most momentum. (Many beginners need all the help they could get.) Don’t put the hands too far from the wall, otherwise you will arch your back excessively. This video demonstrates this perfectly. Note how he has his upper leg locked straight and foot pointed to create good habits from the start. Kick up as slowly as you can, and bring the leading leg up to the balance long before the second one. Then raise your second leg slowly to meet the first, feeling your balance the whole way. Note how the video shows him taking several tries to finally get the leg up to the wall. With each try he pushes a little bit higher so everything is in control. Just do it.
Some Tips for the Kick Up:
- Make your setup super strong. You want to minimize the number of variables and adjustments you need to make during the kick/tuck up.
- Arms locked with the shoulders shrugged up to cover the ears. You don’t want your arms to bend as you kick up.
- Bring your feet close to your hands before kicking up so your hips are over your hands as much as possible and don’t have to travel very far. (Kicking up from a long downward dog-like position is difficult because the hips have to travel a lot more to go over the shoulders.)
- I also like to get on the tippy toes of the bottom leg to help bring the hips over as much as possible.
- In the beginning, you may have to kick up very fast, but overtime, kick up as slowly as you can, and bring the leading leg up to the balance long before the second one. Then raise your second leg slowly to meet the first, feeling your balance the whole way. (Don’t kick up with one leg after another hurriedly!)
- Purposely keep your hands somewhat close to the wall so it teaches you to not slam into the wall but enter it with control. It also forces you to not stick your head out and have an arched spine.
- Bonus drill: Do the kick up with your other leg. (Strive to be ambidextrous!)
- Bonus drill #2: LAND with the leg you’re not used to landing on. (I had to learn this when I hurt my right leg and realized landing on my right leg after a wall handstand was not a good idea. It was a very good thing to adjust.)
The Tuck Up (Beginner)
The tuck up involves getting both feet up together at the same time. It’s really nice because it’s symmetrical and it will teach you to enter the handstand with much greater control, but it’s harder than the single-leg kick up. I highly recommend it because it helps build tons of control and strength. Ryan’s video tutorial is excellent for breaking down how to do this:
The Straddle Up (Intermediate)
Set your hands and set your legs in a straddle by setting them slightly apart. Kick both up and drive them outward toward the sides. Point the toes and lock the legs out the entire time as you drive them outward. You could remain in a straddle or bring the legs together. If you end in a straddle with your back to the wall and need the wall for support, end with either your feet or butt touching the wall. (Btw, keeping the legs straddled feels amazing.)
The Pike Up (Intermediate)
This is the most difficult version of kicking up because you kick both legs together and come up with straight legs. This will help you build up some great body tension and is a great habit to practice.
Note: These are not handstand “presses.” These are kick ups to help you play with different ways of entering a handstands. “Pressing” up slowly and controlled from a straddle or pike is extremely difficult and out of the scope of this article.
Drills To Do In a Back-to-Wall Handstand
The more drills, the better, to increase movement
complexity and increase your ability to find your balance.
Prerequisite: Again, you shouldn’t jump into these until you feel very comfortable with holding a 60sec CTW-HS.
Learning to balance from your fingers is going to be one of the most important ways to correct your balance. A handstand is always an active balance, you stay up because of (ideally very small) adjustments you make in the body. These can be done in the shoulders, hips, arms, etc. but the fingers are the ones that most easily can make the most difference. So let’s begin with heel pulls…
Heel Pulls (Intermediate)
The aim of this drill is to understand the connection of the fingers with the body. The goal is to be able to dig the fingertips in so the correction travels up the body and realigns the handstand. So, in this back to wall handstand, it’s normal for the back to be slightly arched, BUT, that doesn’t mean you should be arching more as the fingers pulse your feet off. It’s very important to keep the body TIGHT, TIGHT, TIGHT. As you pulse the fingers, don’t let your ribs flare out and allow yourself to arch more. No, just stay TIGHT as the feet come off. Then let the feet go back on the wall, and repeat. A good goal to build up to is 10 reps in a set. If you need to pike or do things with your hips to save it, do what you gotta do. Don’t put the hands too far from the wall, otherwise you will make the exercise too difficult.
Tuck Up Calibration and Strengthening Drill (Intermediate)
This is a excellent calibration drill that you could do for your back to wall control. He makes it look easy, but it’s actually quite confusing upside down! It will help increase your proprioceptive abilities really well and help strengthen your tuck up at the same time.
- Don’t place your hands too far from the wall so you don’t heavily arch your back.
- Tuck up, extend knees straight, flex knees while keeping the toes on the wall, and then slowly tuck back down.
- Aim to reduce how slowly you tuck down and you’ll exit with great control, too.
Wall Scissor Drill Between Hallways (Intermediate)

Wall Runs Progression (Intermediate to Advanced)
Wall runs won’t build too much balance, so the previous drills above are better for that purpose. But they are difficult and thus, more-so about building strength. You could do these both back or chest-to-wall. Either way, I have written down the breakdown of the mindful progressions demonstrated by Dan Pope. You could go for time or for reps or change the tempo to challenge yourself with this exercise.
Get comfortable doing MANY reps of one progression before going to the next:
- Shift your body with the legs together tight.
- Shift enough that you go on the fingertips.
- Shift enough that you could raise one hand a few inches.
- Shift and tap the shoulder.
- Shift and tap your hip.
Note: If wall runs (shoulder taps) are still difficult, do them away from the wall and in a straddle like this. (Source: GymnasticBodies)
Close your eyes and imagine you’re in a freestanding handstand
Let’s do a quick visualization, shall we?
You are a human being. Take advantage of your power to visualize and imagine things happening in your minds eye. Instead of kicking up hundreds/thousands of times without ever actually believing you’re going to stay up there for any considerable amount of time… let’s change that.
Close your eyes and imagine the following…
- Imagine YOURSELF standing in an open field. (Not someone else, but YOU.)
- Visualize that you’re setting your hands down firmly, and kicking/tucking/straddling/piking up with EXTREME, UNCANNY CONTROL: The kind of control you DREAM of having.
- Hold this handstand for 30+seconds in your minds eye.
- Repeat this in both the first-person and third person views:
- In the first person view, you’re could look at the ground or even tuck your chin in to look at your toes.
- In the third person view, you’re watching yourself like a spectator. Pan all around and marvel at your perfect line.
Go ahead. Close your eyes and visualize yourself holding a 30+sec HS right NOW.
If you’ve never done this before, you may find it’s actually difficult to imagine yourself holding a perfect handstand for the full 30+seconds. So close your eyes and take a minute to imagine the glory of yourself in a straight, freestanding handstand. Imagine all the micro-adjustments you have to do while in it. Revel in the joy. Smile.
Now that you have actually envisioned yourself in a handstand and are one step closer to believing you could do it, let’s look at the neuromuscular side to things…
The Neuromuscular Aspect of Balancing a Freestanding HS
Some more tips to help you bridge the gap between the wall and freestanding.
Building the strength and mobility is easy enough. It’s the balancing aspect most people struggle with. So let’s continue exploring this part…
Handstand practice is highly skill-specific training: Balancing a handstand requires a very high degree of self-awareness. It demands complete proprioception and the ability to hold full body tension in all the right areas in the right amount. So, the mental connections need to be established like crazy and there’s no better way to doing it than practicing all the drills.
Variety: The reason there is lots of variety in this article is because you need to understand how to engage your body in many different scenarios. Different people will find they prefer different ways of entering/exiting a handstand and you never know which drill will be the one that makes everything click for you.
Before you kick up, expect to fight for it: The freestanding HS takes a leap of faith, but you’re not going to stay up there at all without having to do subtle things with your fingers or legs. So instead of kicking up and just hoping you’re going to magically stick it, expect to fight for it. Immediately expect that you may have to dig your fingers in to prevent you from going over. Instead of immediately bailing out to the side, visualize yourself going up into it right before hand (remember the visual meditation section?) and then go up into it!
Instinct: Holding a handstand feels relatively effortless and looks effortless when it’s done right. In reality you’re actively re-balancing yourself through subtle reactive motions (or sometimes, not so subtle). These need to be so well ingrained in you that it’s almost happening by instinct without thinking. If you take too long to correct something, you’re down already. So I’m just letting you know, that there’s a huge mental/internal experience here that goes beyond intellectualizing. And for that, there’s nothing better than practice, practice, practice to help the light bulb moments keep on lighting up.
Surface Consistency: Choose a surface that is consistent. For example, in Emmet’s training bag, he has a piece of wood that he takes with him and places it somewhere level. Don’t let the inconsistency of grass be the reason (or excuse) that you can’t stick the handstand. (Or a dirty room for not having enough space to practice a forward roll. Rearrange and clean your room!)
Frequently Asked Questions
I tried to organize the questions from beginners to more advanced questions.
Q: My head feels uncomfortable like it’s going to explode when I’m upside down. Does this uncomfortable feeling get better or do you get used to it?
It goes away after a while. Remember to breathe while upside down and the body will adapt with practice. People tend to hold their breaths when they are bracing themselves in stressful situations which makes matters worse. Let’s examine breathing for a moment. This is a video for breathing in a HS that tells you to try speaking (or say the alphabet) while you’re upside down. This is a post by Emmet Louis with drills to teach you how to breath using the chest and to not take sudden inhale/exhales that disrupt your stability. By the way, Emmet spends nearly 2 hours in his weekend HS seminars on breathing alone. That’s how important it is to do it properly!
Q: Help! I’m a beginner and my shoulders are really weak, what can I do to strengthen them?
- Cast wall walks where you simply walk into a chest to wall HS and walk back out and repeat. Stay tight.
- Shoulder shrugs in a HS. let your shoulders relax and then push them up toward your ears and repeat.
Q: What do I do with my head?
If you tilt your head excessively so it juts out ahead of your arms just to look at your fingers, then your back will want to arch. So get into the habit of looking down at the ground with your eyes, not your head. You want to be able to see your hands in your peripheral vision, not your fingers. If you try to look at your fingers directly, it’s going to make your head crane excessively.

By the way, that’s another reason why a chest to wall HS, because you could just look at the wall and that helps you keep a really nice straight back with open shoulders. But doing that in a freestanding handstand is more advanced because you don’t have a spot to focus on. So the way to go about it is to look down between your hands with your eyes, but try to keep the ears between your arms.
Q: How do I place my hands and fingers?
Rather than leaving the fingers flat on the floor, practice what is called the “Cambered Hand Technique.” This will allow you to use your fingers to rebalance. Everything is hinging on this hand and wrist, so it’s important you learn how to use it!

Q: What should I do with my feet?
Beginners tend to go floppy and loose with their legs. Try to make your toes touch the sky to lift you up against gravity. Really try to point those feet and reach them up! Try to engage your lower body (glutes, inner thighs, feet) so that it pulls you up against gravity!
Q: Can I just skip the chest-to-wall version and go straight to back-to-wall HS practice?
The back to wall version will make your back curve and that is a difficult habit to have to undo later on down the line. The chest-to-wall version helps you get good at generating full body tension (especially your LEGS) while in the RIGHT position. Plus, it will naturally open up your shoulders the closer you get your wrists to the wall. If it’s scary to come down, don’t stay in the chest to wall HS until failure so you could walk it out or practice the pirouette bail. When you’re comfortable with the chest to wall version, it’s a good idea to practice BOTH chest and back to wall in a session.
Q: My shoulders are open and I pass the mobility tests, but when I go up into HS, my shoulders are closed, what can I do?
Continue working adamantly on stretching AND strengthening your shoulders, but other than that: Open your shoulders back and forth immediately before kicking up, like this and if your shoulders are indeed open enough, it will feel like you will lock into position much better. Also, make sure your feet are not too far from your hands so your hips don’t have to travel very far. That way, you could get in the HS with shoulders open and not having to fix too much when you get there.
Q: When I try to tuck up with both feet up at the same time, I can barely get my hips over, and can’t straighten the legs with control, what do I do?
Well, that’s totally normal. The tuck up isn’t easy and extending the legs can feel quite difficult so try this drill that helped me a lot:
- Wear socks and go into a chest-to-wall handstand with your hands 1-2ft away from the wall. Slide the feet down into a tight tuck and extend them back up. Repeat. Start with 3 sets of 3-5 reps for starters. Again, socks are awesome for this to help you slide.
Q: When attempting freestanding HS, how do I stop my feet from going over my head?
Heel Pulls will teach you to use the power of your fingers to correct overbalancing. Don’t put your hands far from the wall as it will make the exercise too difficult when you’re first starting out. During these heel pulls, the cambered hand technique helps give your fingers tons of power. To demonstrate how much power your fingers can generate to help your rebalance, put your hands together and try to replicate the cambered hand technique against each other like this video shows (starts at 6min).
Q: When attempting freestanding HS, how do I stop my feet from falling down the way I came up?
There are a number of ways to correct it. You could do it by…
- Digging palms into the floor first, then bending the elbows, piking the hips, planching the shoulders (aka leaning the shoulders forward), or any combination of the above.
- It’s always sounded counter intuitive that piking would save it but it makes sense cause the butt will move past the fingers in that scenario if you do that.
- If you’re missing mobility in the wrists and shoulders, that will also tend to cause your feet to want to fall back down, so again, don’t neglect the wrist/shoulder stuff.
- Also, do Toe Pulls.
In conclusion…
Achieving a solid freestanding handstand is a long, non-linear journey for most people. For a long time I didn’t even know what to do and I was deathly afraid of going upside down and my core was not strong enough so I put it on the back burner and just had fun with the Crow Pose because I didn’t know what else to do. But hopefully you are empowered now with this information and you know what you need to do.
Last but not least: There’s great, great, GREAT value in having a teacher correct you in person, so if you know of someone in your town that could help you, don’t hesitate to hit them up! Sometimes the simplest touch/adjustment in the right spot can make a world of difference!
So go ahead, warm up your wrists, follow the bodyline drills to wake up your core and go for it! Find that floating feeling! Also, since almost everybody has a camera phone of some sort, find a way to take video of yourself from the side during your practice so you know how you’re looking! And if you want other premium programs that I offer, look below for what’s available!
September 28, 2018: Restored many bad youtube links! Thank you to the user who pointed it out. Also, added in/out handstand drill! to chest to wall HS drills.
May 11, 2018: Fixed a defunct link for the wrist warm up.
September 12, 2015: Added this incredible exercise that will build active flexibility in regards to wrist extension. SO after you do your passive wrist extension holds, you follow it up with this exercise.
May 22, 2015: In the core/hollow hold section, I added my video on dragon flags as something to do after you master hollow holds, because your core can never be too strong for straight handstands!
May 17, 2015: For the “Drills To Do In a Chest to Wall HS” I added the following intermediary progressions:
- L-Handstand Shoulder Taps with one leg up to progression for shoulder taps.
- L-Handstand Push Ups with one leg up
March 3, 2015: At the end of the “drills to do in a back to wall HS” section, I added a photo showing how to make wall runs easier. (Basically go in a wide straddle HS far away from the wall.)
Feb 23, 2015: Added a better version of the side lat stretching in the shoulder mobility section. This video shows the feet.
Jan 20, 2015: I created a mobile/printer friendly version of this page
Jan 15, 2015: Updated Wall Run progression. Realized I was missing a line in the progression. Moved that to the back-to-wall drill section. Also refined the tuck up calibration drill in the back to wall section as well with further refined instructions. Updated some other minor stuff, too.
Jan 12, 2015: Updated toe pull drill with a new video by Emmet Louis who made this tutorial for it.
Jan 4, 2015: As you know, we want to stretch the internal rotators and strengthen the external rotators. That is what the Shoulder Mobility section is all about, so I added a couple neat stretches I forgot about that will help open up your shoulders:
- Eagle Arms: Kit Laughlin’s follow along video for this is great
- Shoulder Opener for Forearm Stand (Advanced)
- Holding the forearm stand with hands parallel requires even more external rotation than a regular handstand, so if you open your shoulders up for the forearm stand, it will help as well. For this you would need to place a block between your hands and a strap around your elbows and kick up into a forearm stand. If your shoulders are tight, you’ll feel it.
Dec 24, 2014: Refined bit about the importance of “shallow” breathing while you’re practicing your handstands, especially against the wall so you get used to it. Taking huge gulps of air will disrupt your stability, but keeping it even and steady and not too deep will keep you steady.
Dec 22, 2014: Just updated the description for how to do Toe Pulls (chest to wall drill section) with great detail. Unfortunately, the video doesn’t show the detail I’m talking about, but hopefully you understand.
Also, updated the Heel Pulls (back to wall drill section) with an updated detail… and that is to not let your back arch more as the feet come off, but try to stay TIGHT!
Dec 17, 2014: In the Chest to Wall drills, I replaced the previous “Wall Runs” video with a video by Dan Pope that shows how to progress wall runs much more cleanly and it’s a lot more helpful than the gymnasticbodies one was.
In the section on how to bail out, I added a GIF of a bonus drill: If you’re getting comfortable with the pirouette bail, you might be comfortable enough cartwheeling straight into a Chest to Wall HS and walking your hands closer to the wall.
Dec 16, 2014: In the Chest-to-Wall Drills, I replaced the “Toe Pull” drill video with a video demo by Benny Fergusons which was perfect and much more serene with the woods and all that. Plus, Benny seems like a nice dude.
Dec 15, 2014: I’ve never had something blow up like this before. This got shared 100 times on FB! Woohoo! Thank you to every single one of you who made that happen.
TODO List:
- Record how to do an extra chest to wall drill that isn’t on the youtubes that will help with the tuck up/down
- Add photo of chest to wall hs with arched back versus straight to illustrate point about staying hollow