For several months, I did Pike Pushups as a progression exercise nearly everyday to build up the strength for Handstand Pushups. I documented that journey in great detail in a 3 part series here. And since I got intimately acquainted with this exercise, I am ready to share a ton of tips to help you succeed with it too! I will point out what is proper form & how to set yourself up for consistency.
Pike pushups are more technical to setup and execute than expected
Changing any single one variable can make the exercise seem a lot easier or harder so having a consistent setup is crucial for success. And because it’s a difficult exercise, it’s easy to do it with bad form without even realizing the body is taking shortcuts. Some people find pike pushups so frustrating to master that they resort to doing the barbell equivalent, the overhead press, because they can incrementally increase the load on the bar with far fewer variables to deal with. I’m here to help you to not experience that frustration.
Pike pushups done with proper form are deceptively hard.
I mean like, really hard. It’s very difficult to perform them with proper form. Be warned, most demonstrations on YouTube are shown with poor form.
- And the reason for that is simple:
- Ask any fit man to “drop and give me 20!” Most would be able to pull those pushups off.
- But to do 20 decline pike pushups with the feet elevated? Most would be lucky to do a few with proper form!
Obviously they’re not the same exercise, but they are both pushups and have minimal equipment requirements and thus, provide a low barrier to entry, which means less excuses for you to work on them!
How to do Pike Pushups with Proper Form
Form Check #1: Just like with normal pushups, the elbows should not be flaring out to the sides at all
Since this is a progression exercise toward handstand pushups, it’s important to note that a real handstand pushup will never be performed with the elbows flaring outwards. As such, during pike pushups, the forearms or elbows shouldn’t be moving backwards or flaring out to the sides as well. They should remain vertical and fairly static. (To facilitate this, turn the hands out slightly so the index finger faces forward. You can even make it more extreme so the thumb faces forward if your wrists are bothered.)
Form Check #2: Your head should go MUCH MORE FORWARD than you think is enough
This is probably the #1 offender of all people: they dip their head down to go between their hands. No. Stop that. The head should not go down between your hands. The head should go forward and down. So far forward that your head ends up ahead of the fingers. So far forward that the elbows don’t move backwards whatsoever but maybe they even go forward a teensy bit when you’re even stronger. When in doubt, go more ahead than you think you can. (In any harder variation, like a hollow back press or bent arm planche, your head will need to go even more forward.)
What happens if you put your head straight down between the hands? The elbows flare out to the sides and it increases the strain on the elbow and shoulder joints. You’ll be able to do more reps with this improper form, misleading you to think that you’re stronger than you actually are. (Remember, this exercise is deceptively hard when done right.)
Form Check #3: Your nose should touch the ground
Rather than aiming for the top of the head to touch the ground, have the nose touch it. You get more range that way.
How To Set Yourself Up For Consistency
Setup Tip #1: Start with (Feet-Elevated) Decline Pike Pushups
Doing pike pushups with feet on the ground is OK but I suggest you start with decline pike pushups where the feet are slightly elevated. This will mitigate any hamstring flexibility issues and make the exercise feel less awkward. Even if the flexibility is not an issue, I highly recommend it. Also, one should be comfortable with regular pushups. If you have been doing them properly, the way I recommend, then you have a solid base.
Setup Tip#2: The hands should be about shoulder width apart
Setting the hands wider than shoulder width will feel easier because there’s less range of motion. Setting the hands narrower than shoulder width will feel very difficult and is an advanced variant. Keep the hands at around shoulder width apart for optimum range and intensity.
Setup Tip #3: Choose an object you could elevate your feet on and stick to that height
I put my feet on a chair (about knee height) and did that for 6 weeks minimum before elevating the feet onto the couch (about hip height).
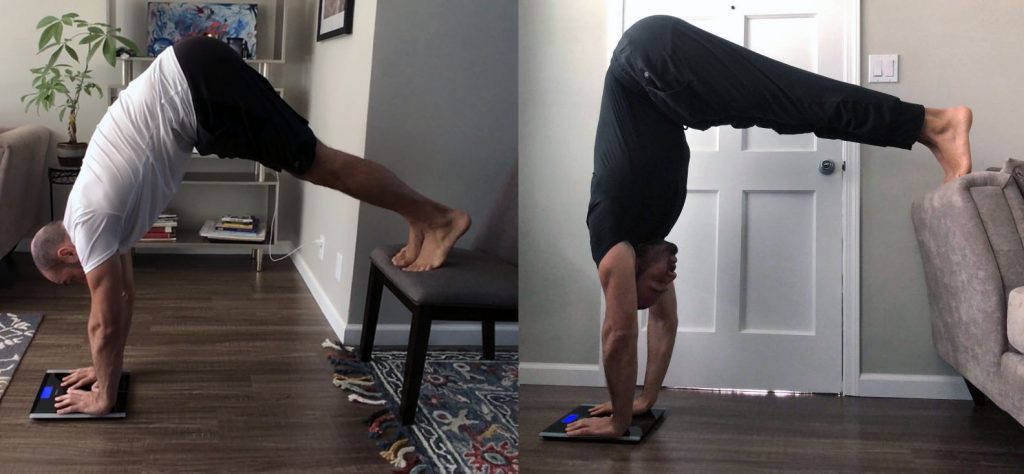
The difference between the above settings for the feet is only ~6% which doesn’t sound like much, but it is considering the lower setting is already quite difficult at ~77% intensity so don’t start at the highest possible setting. This exercise is humbling. The height of the feet should be the same for a while.
Setup Tip #4: Place the feet near the edge of the platform
When I was using a chair, I would make sure my feet were placed right near the edge of the chair. If I placed the feet further back, toward the middle of the chair, the exercise would be far easier. (When I elevated the feet to hip height, I was using the side of my couch. Luckily, arm-rest was narrow so I couldn’t set my feet too far back or forth.)
Setup Tip #5: If using a movable object to put your feet on, always place them in the same spot.
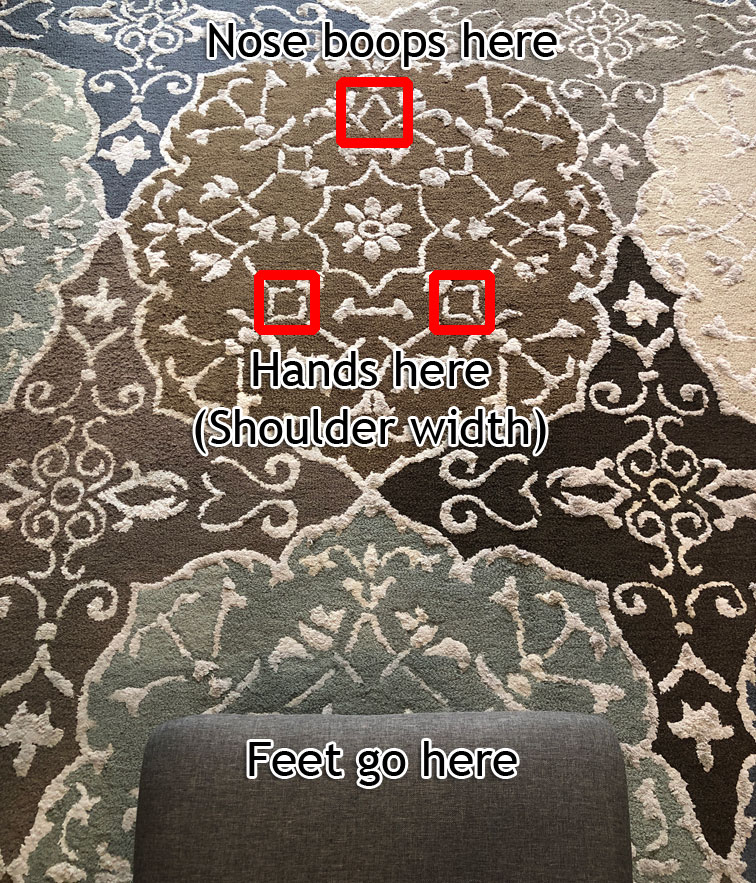
When I was using a chair, I would place the legs of the chair exactly at the edge of the carpet each and every time. Then, my feet would go at the end of the chair and my hands would go on the same spot on the carpet everytime. And finally, when doing the actual pushup, my nose would always hit the same spot on the carpet as well.
Setup Tip #6: Use a landmark for where your nose should touch for each and every rep.
Do this to ensure you’re going forward enough. On the carpet, I chose a pattern to aim for. One inch forward or backward makes a huge difference so I always made sure I was going forward enough. On a smooth floor, I use a piece of invisible tape to mark the spot.
Setup Tip #7: The distance of the hands from the feet should always be the same.
Setup the hands close enough to almost be an L-shape, but not tighter than an L-shape. (This was a distance of about 36″ (1 meter) for me. Your mileage may vary.)
Setup Tip #8: Don’t place the hands too close to your feet even if your flexibility allows for it.
The closer you bring the hands to the feet, the harder the exercise becomes. So you might think closer is better to maximize the intensity. But it’s not the best course of action for consistency sake because placing your hands further back makes the exercise exponentially harder as mere millimeters change the load significantly. If your hamstring flexibility and pike compression is great and you can compress yourself tighter than an L-shape, you may be tempted to make the exercise harder by simply moving your hands backwards, but the inconsistency can cause frustration and make you think you’re weak, so don’t do it.
Note: I’m not saying you should NEVER bring your hands close. Eventually, you will be able to place your feet close to your hands, do a pike pushup and lift your feet up and press up into a handstand. You can even “teeter totter” like that if you stay piked and are obscenely strong. But you need to choose a setting that’s going to help you get the reps in.
More Tips for Success
- Warmup with wall facing scapular wall slides with protraction as well as palm pulses and wrist pushups for wrist work in the morning.
- To help you get through the tough reps, grip the floor like a madman and it will help you generate more strength.
- Don’t forget to breathe. Exhale on the way up. Inhale on the way down. You can experiment with the reverse as well but most importantly, don’t forget to breathe.
- Drop-set trick for the last rep: If you know you’re definitely going to fail the next rep if you go for it, put your hands half an inch or an inch forward and you’ll be able to complete it. I only recommend this for emergencies so don’t overuse this trick. A lot of the times when you’re nearing the final rep, it is psychological whether you can complete it or not, so don’t give in thinking there’s no way you’re going to make it just because the previous one was a real slow grind. Don’t sell yourself short.
- If your lower back feels strained, squeeze your glutes! During the ascent, the lower back will tend to arch. Eventually, when you do HSPU’s, with no L-shape, your hips will be in a neutral position the entire time and you will need to squeeze your glutes the entire time anyway, especially as you press up as your lower back will collapse if you are not firm there. So it’s a good habit to squeeze the glutes. (This is also a bit tricky as the glutes are hip extensors and when pressing up and returning back into the L-shape, that’s hip flexion. So you may feel you’re fighting against the natural pathway, which you are, so don’t overdo this and only do it if you feel strain on the lower back.)
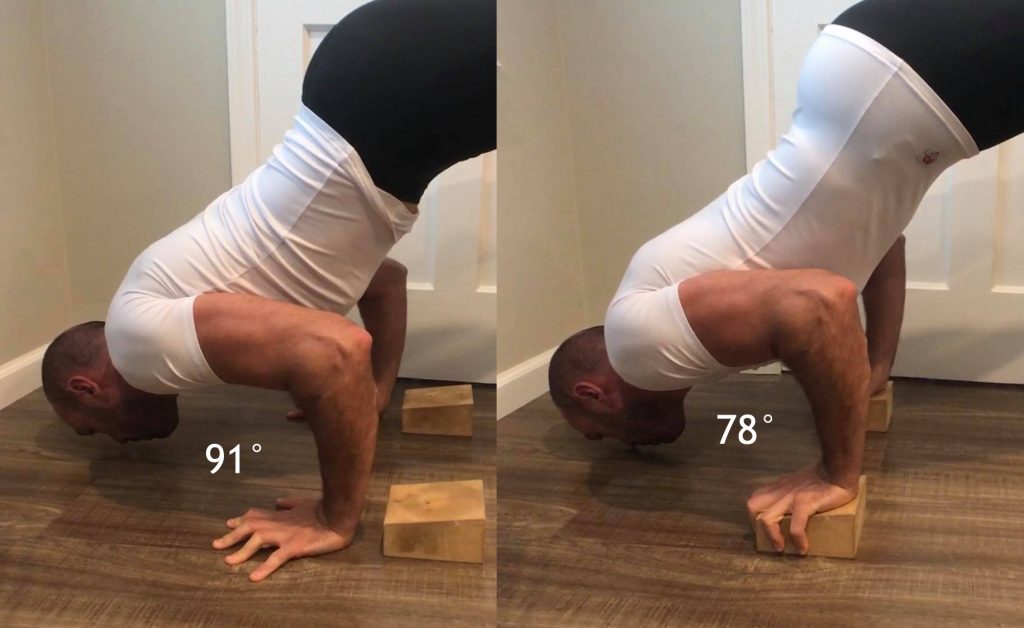
- Elevate your hands on anything to increase range. You can use yoga blocks, parallettes, decline handstand blocks or stairs so your head goes “below” the floor to increase your range.
Tempo Tips
- Don’t rush the negative phase
- Slow down the negative phase so it takes a solid 2-3 seconds rather than just one second or less. In doing so you build more strength and make better use of your time.
- Pause at the bottom occasionally to reduce the stretch reflex
- This strengthens you in the hardest part of the exercise and forces you to press up using all your strength without utilizing the elastic nature of your muscular tissues because you made all the potential energy dissipate from pausing.
- Explode up
- Press yourself up as fast as possible with perfect form. In the beginning it was hard to push quickly. It was actually impossible. But the intention is what matters. I tried to pushup as fast as possible and although it was slow, it got slowly faster. It wasn’t until exactly one month into the training where I was pushing actually faster for the first time during the concentric phase. After 3 months, I could feel the quality of my strength had changed dramatically. I could muster through reps where otherwise it would’ve failed in the past and perform the concentric faster than ever.
To recap…
- Don’t flare your elbows.
- Send the head and shoulders forward and down, not just down.
- Make sure your nose boops the ground, not the top of your head.
- Hands shoulder-width apart.
- Elevate your feet on something and stick to that.
- Place feet at edge of platform and hands far enough to make an L-shape, but not closer.
- Use carpet patterns or wood grain (or tape) as target landmarks for hands and nose.
- Take 2-3secs to go down, pause at the bottom sometimes and always explode up.
So there you have it! Your comprehensive guide toward tackling the pike pushups! If you have any questions, please let me know! And if you have not read the 3-part series on how I used them to gain the strength for the Handstand Pushup, click here to do so!
