Floor L-sit Progression Tutorial by Antranik

I clearly remember the elation I felt when I could hold a full L-sit, with straight legs, for TWO seconds. It took all summer to get to those TWO seconds. Holding up the L-sit takes a ridiculous amount of ab and quad/hip-flexor strength. Strength that I never had before. And the cool thing is that this exercise will keep me busy well into next summer because from an L-sit, I could work towards the V-sit. The other interesting thing is that to lift higher toward the V-sit, my quads have to flex harder and my abs have to compress more, so this actually forces the hamstrings to stretch. Active flexibility at its finest. There’s something beautiful about something being SO simple.

My Floor L-sit Video Tutorial

Progressions for the Floor L-sit

Goal: 1 Minute Hold for each progression before moving to the next one.

Start with the first progression. You’re going to have to do as many sets needed to accumulate 60 seconds of practice in for the day. Once you’re able to hold the exercise for a full minute without interruption, you could move to the next progression.

Rather than being happy with just the butt just off the ground, make sure the shoulders are depressed absolutely as far as possible. It makes the hold feel different in my abs, shoulders, and triceps.  You will experience a wonderful expansion in your range of movement. Your lower traps and other muscles in that area will loosen up and the clearance will increase!
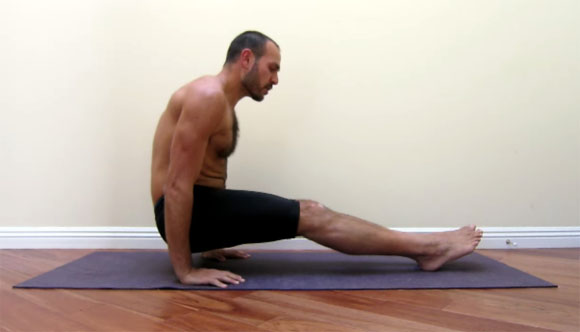
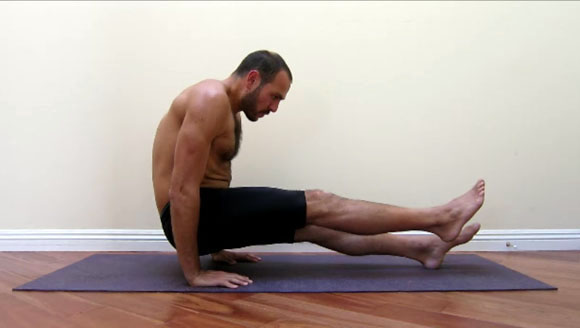
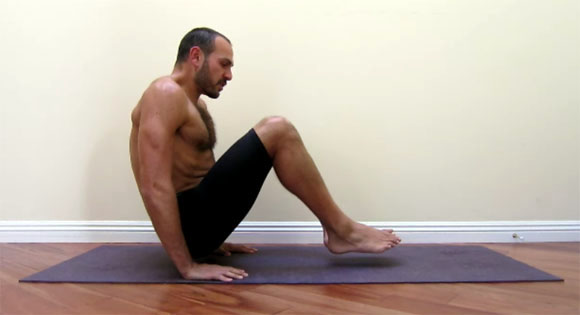
antranik demonstrating a foot supported l sit
1. Foot Supported L-sit.
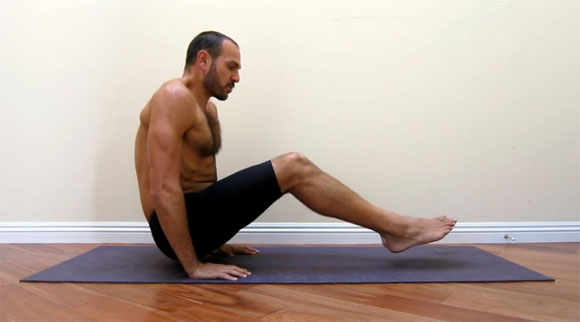
antranik demonstrating a ONE foot supported l sit
2. One Foot Supported L-sit
antranik demonstrating a tucked L sit
3. Tucked L-sit
4. Less Tucked (Advanced Tuck) L-Sit
4. Less Tucked L-Sit
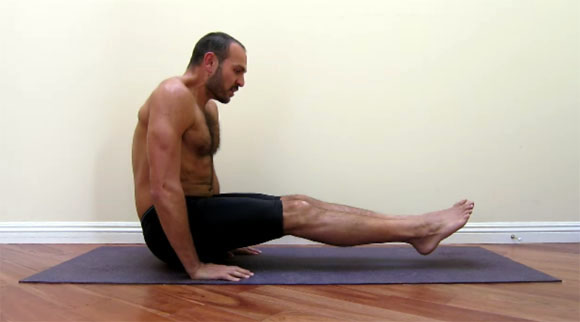
antranik demonstrating a full straight floor l sit
5. Full L-sit with straight legs.

This is an easy breakdown of the sets and hold times used to hit that 60sec aggregate. Notice they all simply add up to 60 seconds.  As you get stronger, you need less sets and the workout itself doesn’t take as long (until you move to the next progression).

  • 6x10sec
  • 4x15sec
  • 3x20sec
  • 2x30sec
  • 1x60sec (Your goal!)

Help! My Quads and Hip Flexors are Cramping Like Crazy!

Click here to expand

You’ve probably never had to contract your quads that powerfully, for that long, ever before in your life. This is extremely common and it will go away if you keep working out.  Just stand up and massage the areas that hurt.

At the end of your L-sit training or workout of the day, end it with a very simple yoga routine like this one (it’s just a few minutes long) that is focused on stretching the hip-flexors. After you follow that video once or twice, you’ll probably remember all the exercises and be able to do it on your own whenever you want.

Steven Low, author of Overcoming Gravity, writes about the physiological reason for cramping: “Cramping is normal when you start. Isometric contractions above 65% (IIRC) will cut off blood flow to the muscle, and if your muscles are not used to exercise they will become hypoxic. Hypoxic muscles will cramp, especially when in a shortened range of motion with large amounts of overlap of actin-myosin cross bridges. (Reason for this is ATP is needed to unbind myosin-actin cross bridges, and if there’s not enough oxygen there is not enough ATP generation). Basically, massage your quads and keep working them regularly and it will go away in a couple weeks completely.”

Help! I can’t do the tucked L-sit!

Click here to expand

First of all, do NOT skip out on the two previous progression exercises. If you mastered those foot-supported progressions and you still can’t hold a tucked L-sit, here’s an intermediary step to help you get used to that compressed/tucked state.

Tucked, One-Foot Supported L-sit:

  1. Tuck your knees close to your chest with the knees together.
  2. Put your hands down in front of you and press your butt off the floor (like a tucked, foot supported L-sit)
  3. Now, lift one foot off the floor by tucking that knee even closer. (like a tucked, one-foot supported L-sit)

Your hips may want to swing ahead of your hands to make it easier, but don’t let it. The more you tuck and the more you keep your hips behind your hands, the more intense the compression will be. That should help get you stronger in that very awkward position and help you understand what needs to be engaged as well. Do 30sec+ holds of this tucked, one-foot supported L-sit and it should help be an intermediary step for the tucked L-sit. You don’t have to get stuck on doing it for 60sec, just treat it as a stepping stone!

After you get used to that, you should be able to hold the tucked L-sit with both legs lifted for some time. Just keep working in as many sets as you need to and rest as much as you need in between.  Before you know it you’ll be able to hold the tucked L-sit for very long.  It will also be less excruciating, and believe it or not… more comfortable.

Supplement with hanging leg raises: A great supplemental exercise for your abs and hip flexors would be 3×15 hanging leg raises. This video demonstrates the hanging leg raise progressions (tucked -> knees to elbow -> toes to bar).

If you think flexibility is the problem, do 3×10 of these piked compression leg lifts and they will increase both ab strength AND flexibility!

How do you time yourself accurately?

Click here to expand

I used to use my phone for these things but it was so extremely cumbersome to use a phone for such a simple thing. I ended up buying this Casio watch because it is inexpensive ($11 shipped) and has a countdown timer I could use to hit my isometric holds.  This watch dramatically reduces any or all fuckarounditis.  This way I don’t have to fiddle with my phone or anything cumbersome.  You could also set the countdown timer to automatically reset and keep going, so you’ll know if you’ve rested for a minute or whatever. This is just so practical and actually ends up making my workouts super efficient.

If you have any questions let me know.

Once you’ve mastered the floor L-sit (can hold it for 30sec often), then it’s time to move onto more advanced variations. Check out this follow up post: Advanced L-sit, V-sit, Manna Progressions and More!