
Progressions for the RTO Support Hold

If you expect to do anything on the still rings, even the simplest dips, then you must have a steady support hold. This is your foundation.
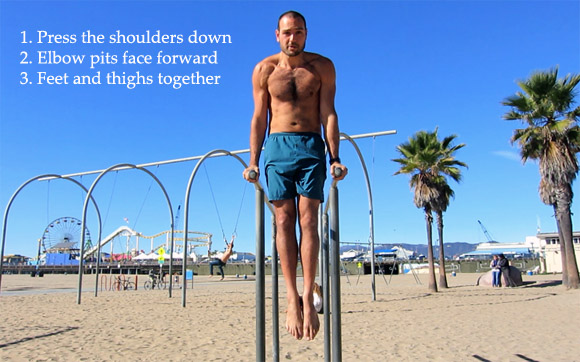
Step 1: Support Hold on the Parallel Bars
- Tighten up every body part starting from your feet and up to your head:
- Feet together and pointed
- Inner thighs together
- Butt flexed
- Arms are straight (not bending)
- Shoulders down away from the ears (just like the L-sit!)
Step 2: Rings Support Hold with a Band
This step may not be necessary but it’s good to know in case it’s too difficult to hold the rings support hold at all despite having a strong foundation on parallel bars. If you don’t have a resistance band, you could also use a long towel or shirt in between the rings and it will work just as well.
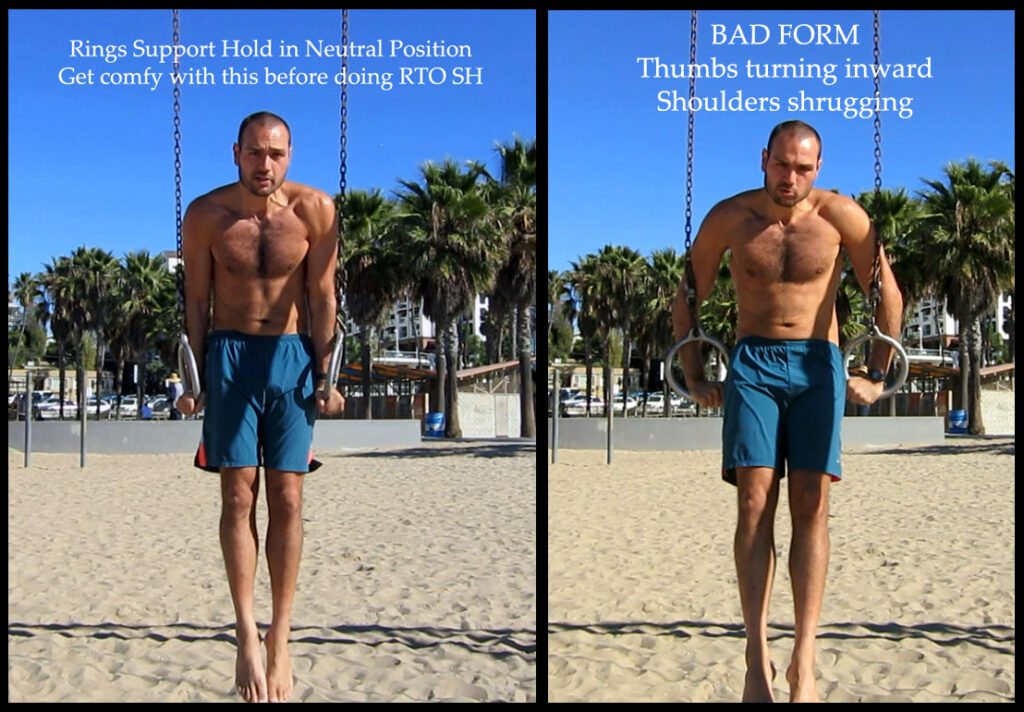
Step 3: Rings Support Hold in Neutral Position
Set the rings low enough so you can just hop up into the support position. If you’ve never done this before, stick the hands to your hips to help you stay up. Note the same cues apply here as they did with the PB. (Elbow pits face forward, shoulders depressed, etc.)
Work in sets to get 60secs of practice until you could hold it for 1 minute. Your progress will look like this:
- 6x10sec
- 4x15sec
- 3x20sec
- 2x30sec
- 1x60sec
Step 4: Rings Turned Out Support Hold (RTO SH)
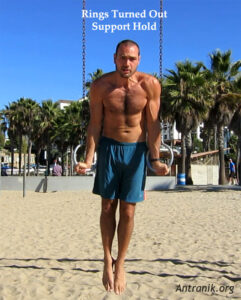
Rings turned out means exactly that: You’re turning the thumbs out to the sides. The elbows remain somewhat close to your body (you’re not trying to do an iron cross) and the elbow pits continue to face forward. This external rotation of the shoulder is the basis for many other moves on the rings. It effectively shortens your arms and increases integrity of the shoulder joint by anatomically screwing the upper arm bone (humerus) into the shoulder socket.
- Initially, you may only be able to turn out a few degrees and it will feel very unstable as if you’re practicing support holds for the first time all over again.
- Turn out to the best of your ability and it will improve with time. Everyone has a different limit as to how much they could turn them out and it will improve over months of practice.
- Make sure your arms are not resting on the top of the rings or straps as that will mask your progress as well.
- Again, work in sets until you could hold RTO SH for at least a minute nonstop. Then, it will be very easy to maintain it.
Update: Watch this Complete Video Tutorial for the Support Hold
Common Question : How do I position my shoulders and shoulder blades? Should a ring support hold be done with a hollow body or not?
Press the shoulders down the back and hold a straight or slightly hollow body. You do not want to arch (backbend) your back at all in this position. But don’t round your back excessively either, try to keep things somewhat neutral. Neutral means it’s okay to round and protract the shoulders ever so slightly. It’s also very common to unconsciously pike a little, meaning, you may be bringing your legs out in front of you, which is fine, just don’t do it excessively. Try to keep the front of the hips “open” (don’t pike) by pointing the toes straight down to the ground rather than ahead.
Anyway, hope this helps. If you have any questions let me know!
Let’s Connect
The best way to stay up to date with the latest content and videos is to sign up for my newsletter!