
How we made the doubleplusmusic bike trailer
It took me months to get all the pieces together needed to make this happen. When I finally had everything I needed, my brother and I built this doubleplusmusic trailer in a couple days. I have included more details on the setup at the end of this post.


Here’s our first test ride with it!
But we kept on with the improvements
")


We finished this trailer and debuted it immediately on another epic midnight ridazz ride in LA, this one was coincidentally called, “The Worlds Biggest Bike Song” and it was dope. Here’s some footage of the ride, including the trailer. 😀
Specs
- Trailer: Some Instep trailer
- Power: Honda EU1000i (900w continious, 1000w max)
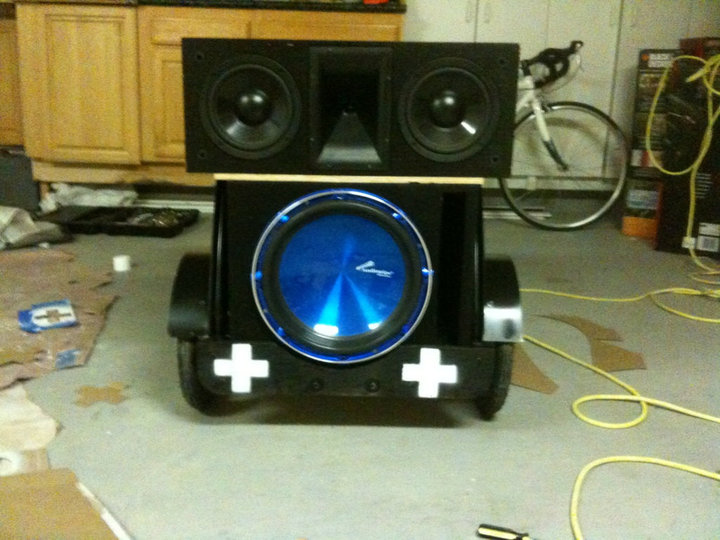
- Sub: Audiopipe 15″ subwoofer (1000w RMS)
- Tops: Klipsch KLF-C7 = 90°x60° Tractrix Horn and Two K-1062-KV 8″ Woofers, 99db sensitivity, 38lbs. (150w RMS, 600 max)
- Amp: QSC PLX 3102
How this all started…
I wanted to create a music trailer for a long time and in 2010 I started to collect the pieces together to make it happen. I used to have a boombox on the rear rack of my bicycle attached with bungie cords but it was only able to provide music for a short distance and the sound quality was poor. I consider myself a connoisseur of music and so I wanted to have powerful, clean, full-range sound. What’s the point of playing Deep House if you have no subwoofer to reproduce the “deep” part? Half the song would be missing, I thought. So I decided it was a must that the sound trailer have a subwoofer so that I could hear the lower frequencies.
Subwoofers recreate the lower frequencies by moving a lot of air and that requires a lot of power. I did my research and realized I wasn’t going to be able to run a large setup on a car battery for very long and I kept my eyes out for those small Honda generators on craigslist. I was able to snag a Honda eu1000i, which is about the weight of a car battery, that was almost new (if not new) for $630. This was the largest expense and made me almost not be able to make rent for that month, but it was worth it.
I found an Instep trailer for $40 from craigslist. These trailers are very frequently for sale on craigslist because parents buy them for their kids and they quickly outgrow them or never use them to begin with.
When I started doing my research for amplifiers I wanted a very high quality amplifier that was going to be able to make full use of all the generator power I had on tap. The problem was that amps get VERY, VERY heavy if they are very powerful. I was keeping my eyes out for Crown and QSC amps because I wanted the sound quality to be very good. I discovered the PLX Series of QSC amps and their specs were absolutely badass. Not only do they provide tons of clean power but they also only weigh 20 pounds!!! I had created a live-bookmark on craigslist to catch any QSC PLX amps and after a few weeks I got lucky! I found a woman selling tons of sound equipment all together including a QSC PLX 3102. I told her I only want that one item and she gave me this $1,200 amplifier for only $240!
I found the 15″ subwoofer able to handle 1000 watts RMS again from someone on craigslist and it only cost me $20. I opted for a ported box for the subwoofer, as opposed to a sealed one, so that I could hit the lower frequencies if need be and got the box from a local stereo shop for $60.
The last piece that I needed to start on the project were the tops: the speakers that would be dedicated to reproducing the mid to high range frequencies. This was a bit difficult to find on craigslist as most of the speaker systems were often limited to just 100 watts RMS. I got lucky when I found somebody selling a Klipsch KLF-C7 on craigslist for $240 (normally $600) that was able to handle quite a bit of power and was going to be perfect for clarity.
As you can tell I used craigslist a lot and it’s because I know how to setup live bookmarks so I’ll easily know when something I want is listed.
In hindsight, I don’t recommend anybody use the instep trailer because they use wheels you’d find in Toys-R-Us products. The hub bearings got really messed up after a full night of riding this through the streets of Los Angeles in one night. We ended up modifying the trailer further, making a dust-proof, sealed enclosure for the amplifier to use the trailer at Burning Man in 2010 and it was very awesome to have great quality mobile sound whenever we wanted.
We will be redoing this music trailer using another trailer that I got from craigslist that has spoked wheels (read: real wheels) with an axle between them so the bearings could definitely handle the 160 pound load on the rugged city streets. I have to find a way to angle the tops up a little bit because when we are in a large group of riders, the people act as a wall and absorb all the sound. If you’re in a group ride with hundreds of riders, 20 riders bunched up together absorb a lot of the sound. If the speakers were 6 feet in the air so that the sound would clear everybody’s heads, the music could then be heard for hundreds of feet! But that’s a huge problem as that top box weighs 40 pounds and lifting it up higher than necessary is kind of scary.
If you have any comments or questions or suggestions please feel free to leave a comment below! Go ride them secksy bicycles.

Let’s Connect
The best way to stay up to date with the latest content and videos is to sign up for my newsletter!